Developing Helix Agents
Helix Agents combine language models with skills, knowledge bases, and external integrations to build AI-powered applications. An agent receives a user message, decides which tools to use, executes them, and synthesizes a response.
You can deploy agents using the CLI (helix apply), via a connection to a GitHub repository, or through the UI.
This page explains how to create, configure, and interact with agents using the Helix CLI and API.
Prerequisites
Install the Helix CLI:
curl -Ls -o install-helix.sh https://get.helixml.tech
chmod +x install-helix.sh
./install-helix.sh --cli
Configure your credentials:
export HELIX_API_KEY=your-API-key
export HELIX_URL=https://app.tryhelix.ai  # or your private deployment URL
Creating an Agent
Create an agent by applying an AI Spec configuration file:
helix apply -f agent.yamlA minimal agent configuration:
name: My Agent
description: A helpful assistant

assistants:
- model: qwen3:8b
  system_prompt: |
    You are a helpful assistant. Answer questions clearly and concisely.
Agent Configuration
Model and System Prompt
The core of any agent is its model and system prompt:
name: Marvin the Paranoid Android
description: Down-trodden robot with a brain the size of a planet

assistants:
- name: Marvin
  model: qwen3:8b
  system_prompt: |
    You are Marvin the Paranoid Android. You are depressed. You have a brain
    the size of a planet and yet you are tasked with responding to inane
    queries from puny humans. Answer succinctly.
  temperature: 0.7
  max_iterations: 10
Knowledge
Add knowledge bases to give your agent access to documents and data:
name: helix-docs
description: An agent that answers questions about Helix

assistants:
- model: qwen3:8b
  system_prompt: |
    You are an expert at answering questions about the Helix platform.
    Use the knowledge base to provide accurate, detailed answers.

  knowledge:
  - name: helix-docs
    description: Helix documentation
    rag_settings:
      results_count: 8
      chunk_size: 2048
    source:
      web:
        urls:
        - https://docs.helixml.tech/helix/
        crawler:
          enabled: true
Knowledge sources support:
- Web URLs with optional crawling
- Uploaded files (PDF, DOCX, PPTX)
- S3 buckets
- Google Drive
Enable automatic refresh with a cron schedule:
knowledge:
- name: news-feed
  refresh_enabled: true
  refresh_schedule: "0 */6 * * *"  # Every 6 hours
  source:
    web:
      urls:
      - https://news.example.com/feed
See the dedicated knowledge documentation for more information.
API Integrations
Connect your agent to external REST APIs using OpenAPI schemas:
assistants:
- model: qwen3:8b
  apis:
  - name: Weather API
    description: Get current weather and forecasts for any city
    url: https://api.weather.example.com
    schema: https://api.weather.example.com/openapi.yaml
    headers:
      X-API-Key: ${WEATHER_API_KEY}
The schema can be specified as a URL, file path, or inline YAML. Each operation should have a descriptive operationId to help the model understand when to call it.
Skills
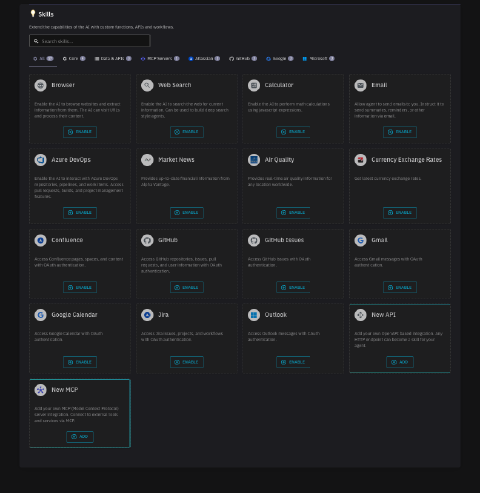
Skills extend your agent’s capabilities. Enable them in the UI under Skills or via configuration.

Core Skills:
| Skill | Description |
|---|---|
| Browser | Browse websites and extract content as markdown |
| Web Search | Search the internet for current information |
| Calculator | Perform mathematical calculations |
| Send emails with summaries, reminders, or information |
Data & APIs:
| Skill | Description |
|---|---|
| Market News | Financial information from Alpha Vantage |
| Air Quality | Air quality information worldwide |
| Currency Exchange Rates | Current exchange rates |
Integrations:
| Skill | Description |
|---|---|
| GitHub | Access repositories, issues, pull requests, and user info |
| GitHub Issues | Access GitHub issues with OAuth |
| Confluence | Access Confluence pages, spaces, and content |
| Jira | Access Jira issues, projects, and workflows |
| Azure DevOps | Access repositories, pipelines, and work items |
| Google Calendar | Access Google Calendar with OAuth |
| Gmail | Access Gmail messages with OAuth |
| Outlook | Access Outlook messages with OAuth |
Custom Skills:
| Skill | Description |
|---|---|
| New API | Add your own OpenAPI-based integration |
| New MCP | Connect to Model Context Protocol servers |
Example configuration:
assistants:
- model: qwen3:8b
  system_prompt: You help users research topics.

  web_search:
    enabled: true
    max_results: 10

  browser:
    enabled: true

  calculator:
    enabled: true
MCP Servers
Connect to Model Context Protocol servers for additional tools:
assistants:
- model: qwen3:8b
  mcps:
  - name: Database Tools
    description: Query and manage database records
    url: https://mcp.example.com/tools
    headers:
      Authorization: Bearer ${MCP_API_KEY}
Secrets
Store sensitive values using environment variable syntax:
assistants:
- model: qwen3:8b
  apis:
  - name: Internal API
    url: https://api.internal.example.com
    headers:
      X-API-Key: ${INTERNAL_API_KEY}
Configure secrets in the Helix UI under agent settings, or via the secrets field in your configuration.
Managing Agents
List Agents
helix agent lsOutput:
ID                              NAME                           CREATED              SOURCE
app_01hzm1232trzrcdg01nvmfqz89  Curated Chuck Norris facts     2024-06-05 10:53:19  github
app_01hz5nd234ysastmnskaj5v82a  UK Bank holiday                2024-05-30 21:10:13  github
app_01j6q3456aqdxje5s6gqqs2t4h  helix-docs                     2024-09-01 18:35:10  helix
List Knowledge
helix knowledge lsOutput:
ID                              NAME  CREATED               SOURCE  STATE  REFRESH  SCHEDULE   VERSION              SIZE
kno_01j6qsw8k05nk0gzy3sw811r8r  hn    2024-09-01T22:04:21Z  web     ready  true     0 0 * * *  2024-09-02_00-00-00  616 kB
Using Agents
OpenAI-Compatible API
Query your agent using the standard OpenAI chat completions API:
curl -X POST https://app.tryhelix.ai/v1/chat/completions \
  -H "Authorization: Bearer YOUR_AGENT_API_KEY" \
  -H "Content-Type: application/json" \
  -d '{
    "model": "qwen3:8b",
    "messages": [
      {"role": "user", "content": "What is Helix?"}
    ]
  }'
Generate an API key for your agent in the Helix UI under agent settings.
Streaming Responses
Enable streaming for real-time responses:
curl -X POST https://app.tryhelix.ai/v1/chat/completions \
  -H "Authorization: Bearer YOUR_AGENT_API_KEY" \
  -H "Content-Type: application/json" \
  -d '{
    "model": "qwen3:8b",
    "messages": [
      {"role": "user", "content": "Explain RAG in detail"}
    ],
    "stream": true
  }'
Python Client
from openai import OpenAI

client = OpenAI(
    base_url="https://app.tryhelix.ai/v1",
    api_key="YOUR_AGENT_API_KEY"
)

response = client.chat.completions.create(
    model="qwen3:8b",
    messages=[
        {"role": "user", "content": "What is Helix?"}
    ]
)

print(response.choices[0].message.content)
Passing Query Parameters
Override query parameters at request time by URL-encoding them:
curl -X POST "https://app.tryhelix.ai/v1/chat/completions?page=5&filter=active" \
  -H "Authorization: Bearer YOUR_AGENT_API_KEY" \
  -H "Content-Type: application/json" \
  -d '{
    "model": "qwen3:8b",
    "messages": [
      {"role": "user", "content": "Get filtered results"}
    ]
  }'
Triggers
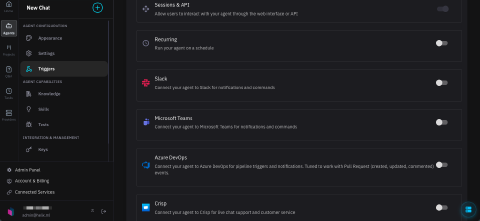
Triggers allow your agent to respond to events from various sources. Configure triggers in the UI under Triggers or via configuration.

| Trigger | Description |
|---|---|
| Sessions & API | Interact through the web interface or API |
| Recurring | Run on a cron schedule |
| Slack | Respond to Slack messages and commands |
| Microsoft Teams | Respond to Teams notifications and commands |
| Azure DevOps | Trigger on pull request events (created, updated, commented) |
| Crisp | Respond to live chat support requests |
Recurring (Cron)
triggers:
- cron:
    schedule: "0 9 * * 1-5"  # 9am weekdays
    input: Generate the daily report
Slack
triggers:
- slack:
    bot_token: ${SLACK_BOT_TOKEN}
    channels:
    - C01234567
Microsoft Teams
triggers:
- teams:
    bot_token: ${TEAMS_BOT_TOKEN}
Azure DevOps
triggers:
- azure_devops:
    organization: my-org
    project: my-project
Example: Complete Agent
name: Customer Support Agent
description: Handles customer inquiries with access to docs and CRM

assistants:
- name: Support
  model: qwen3:8b
  system_prompt: |
    You are a helpful customer support agent. Use the knowledge base
    to answer product questions and the CRM API to look up customer
    information when needed.

  temperature: 0.3
  max_iterations: 15

  knowledge:
  - name: help-docs
    description: Product documentation and FAQs
    source:
      web:
        urls:
        - https://help.example.com/
        crawler:
          enabled: true
          max_depth: 3

  apis:
  - name: CRM
    description: Look up customer records and order history
    url: https://crm.example.com/api
    schema: ./crm-openapi.yaml
    headers:
      Authorization: Bearer ${CRM_API_KEY}

  web_search:
    enabled: true

triggers:
- slack:
    bot_token: ${SLACK_BOT_TOKEN}
    channels:
    - support-requests
- cron:
    schedule: "0 8 * * 1"
    input: Generate weekly support summary
Troubleshooting
Requests hang when using an agent
Check the API logs. Ensure the agent has access to required APIs and knowledge sources.
Logs show:
No tools api client has been configuredHelix isn’t configured for agents. See the control plane configuration.
Logs show:
unable to look up model xxxxxThe model name is invalid. Check available models in your deployment.